Advanced Rough does not mill completely

Hi,

I’ve three pockets all of different depth. Doing an Advanced Rough on them does not end in full depth milling:

I only become true for those depth, that is defined with Bottom. Can someone explain why? Do I really need a further operation to get the rest milled, too?

Regards, Harald

Hi again,

really now??? Am I going mad???
As I still do not have an idea about my former post I tried to fix it with Advanced Z Level Finish using Rest Finishing.

It throws me:
image
with Tool from Previous Operation.
It also does with User Defined Tool
image
and
image
but calculates with no error using
image
but surprise, no toolpath is generated/shown in Advanced Z Level Finish

The system wins, i’m knocked out :anguished:
Please help!
Regards, Harald

BTW:


without using Rest Finishing the calculation generates a toolpath but still not going down to the pockets level.
It all gets only down to a multiplicative multiple of Depth of Cut (as it also does in Advanced Rough :frowning: )
Bye, Harald

Hello Harald,

Have you tried checking the Machine Flatlands on the Options page for Advanced Rough. I believe this should solve the problem.

Another thing you may have to do is check the Num. of Intermediate Steps on the parameter page and put a value 2 or greater in there.

Hope this was helpful.
David.

Hi David,

yes, the Flatlands helps in this case. But they work just on flat areas. Sloping areas remains untouched:
image

And: what, if users don’t have the license for Advanced Roughing. Z-Level Rough combined with Z-Level Finish also do not work.

All used CAMs in the past I can remember in a easy manner gets down the cutting level. The last cut is done with the remaining depth. Why not BobCAM doing so?

The Intermediate Steps do nothing to me. 2, 10, 20, 30 didn’t work.

I’m convinced I am doing something wrong. Only what? The requirement is simple: mill the selected areas to the maximum depth.

Also very strange: why must I fool BobCAM with a wrong tool diameter to get the Rest Finish to work but results in no toolpath at all?

Bye, Harald

Can you just use the 2d pocket?

Have you tried setting your Global Offset to 0.00, this should allow the tool to go to the bottom, if you want a side allowance then there is the option to have that with no bottom allowance ??

No, all the pockets are of different depth that are not known by 2D operations. I originally assumed that 3D operations could handle this.

Yes, of course. First it didn’t help and second if it would do the job it would be used incorrectly, because no allowance would be possible to set.

Again: pockets with different depth should be milled in one operation that way, that each pocket gets close to the bottom with remaining material defined in the allowance field.

By the way: I don’t manage to get rid of the problem with operation “Z Level Rough” either.

Here is a sample I would love to see if one get it to work (one operation mills all pockets down to each depth): Mill2Bottom.stp (27.1 KB)

Bye, Harald

Yea if depth is the only issue do each pocket as it’s own feature and your good .

Aha… I always thought that a CAM program should on the one hand create the milling path and on the other hand reduce the necessary effort as much as possible. Many of my customers - like me - are unfortunately not having the happy situation of having time without end.

You would not use Flatlands in this case and yes, you would want to use intermediate steps.

Here is an example of how Intermediate Steps is applied on an example part:

These are the settings I used:

It is possible that you are not getting intermediate steps because the gap between the furthest area of the slope is within the allowance you have set.

As for the “Wrong Tool Diameter”, I do not know what you are referring to, if you want, make another post for that separately or send in the file to support@bobcad.com.

If you want to private message
with all the other issues you see with the software, please feel free to.

Hi,

yes: many roads lead to Rome. But if you can help make it easier, that can only be in everyone’s interest. And as stated in Post5: how should users do not having Flatlands and Intermediate steps but just ‘Z-Level Rough’ and ‘Z-level Finish’?

this refers to my second post in this topic. To not get an error during Toolpath Calculation, I had first to enter a ‘Previous Tool Diameter’ = 6.01mm and 'Previous Corner Radius" = 3.0mm. The calculation does not work for smaller numbers of one of the two values as it does not with Rest Finishing set to ‘Tool from Previous Operation’ (which was a 6mm cutter).

Bye, Harald

I wanted to chime in on this one as well. I have been thinking about the real cause of this issue.

If I am correct, the issue is: Because you have multiple pockets, and the depths of those pockets are all different, in some pockets you do not seem to get a pass that is as deep as it could/should be.

This happens for the following reasons:

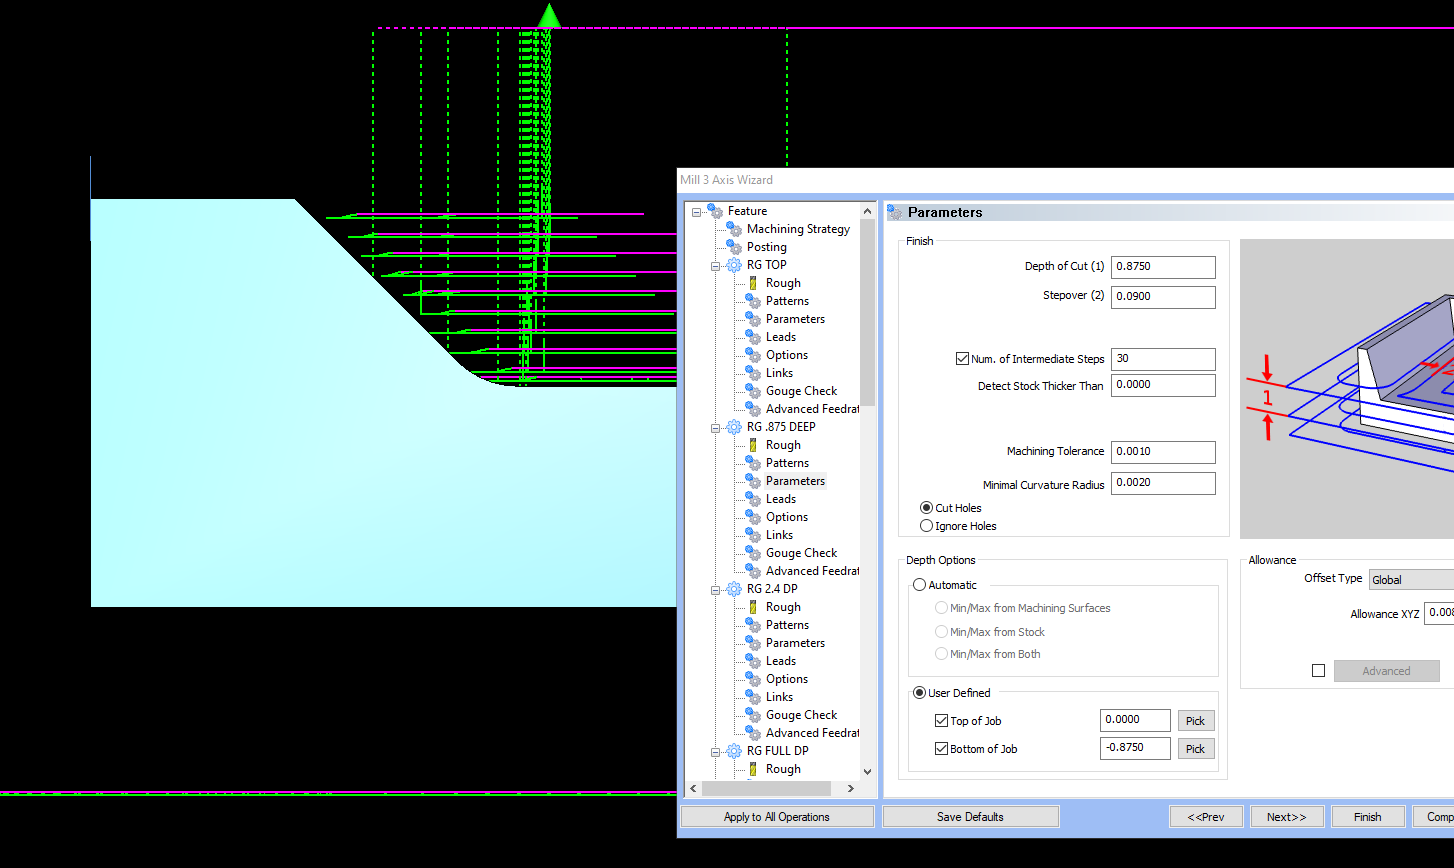
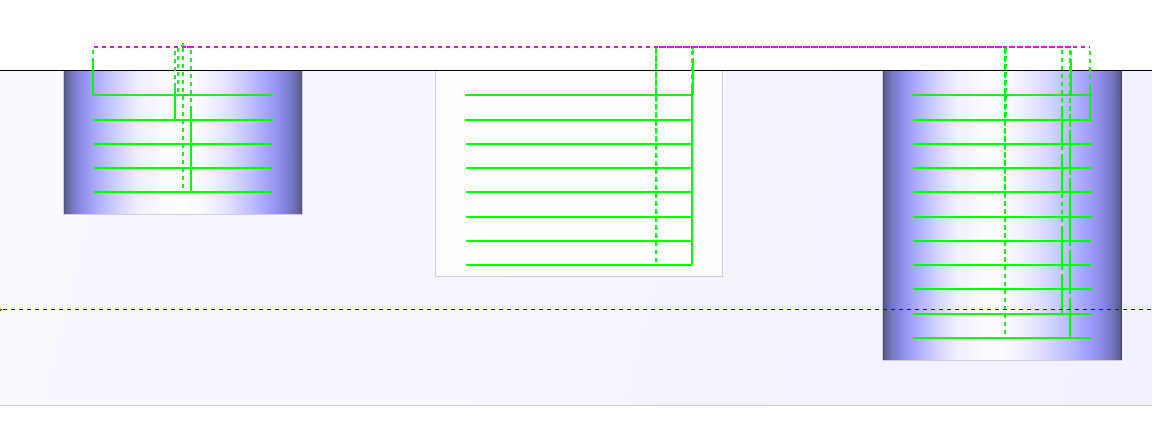
1 - The toolpaths are calculated from TOP down. What I mean by this is, the toolpath starts at the top of feature/stock and the depth cut value is applied in reference to this position.

2 - Your depth cut amount is not a division of the depth of your pocket. I will expand what I mean.

When the toolpath is calculated (top down) each depth cut is applied until another depth cut cannot be made because the bottom of the pocket/part surface (Plus any stock to leave) has been reached and another full step down cannot be completed.

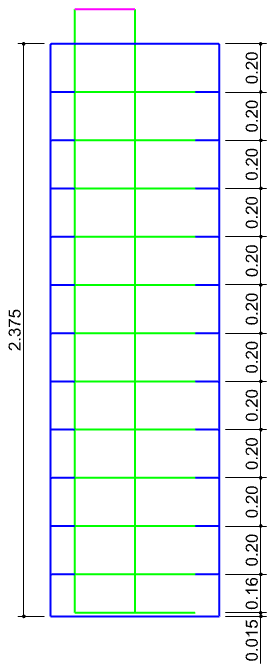
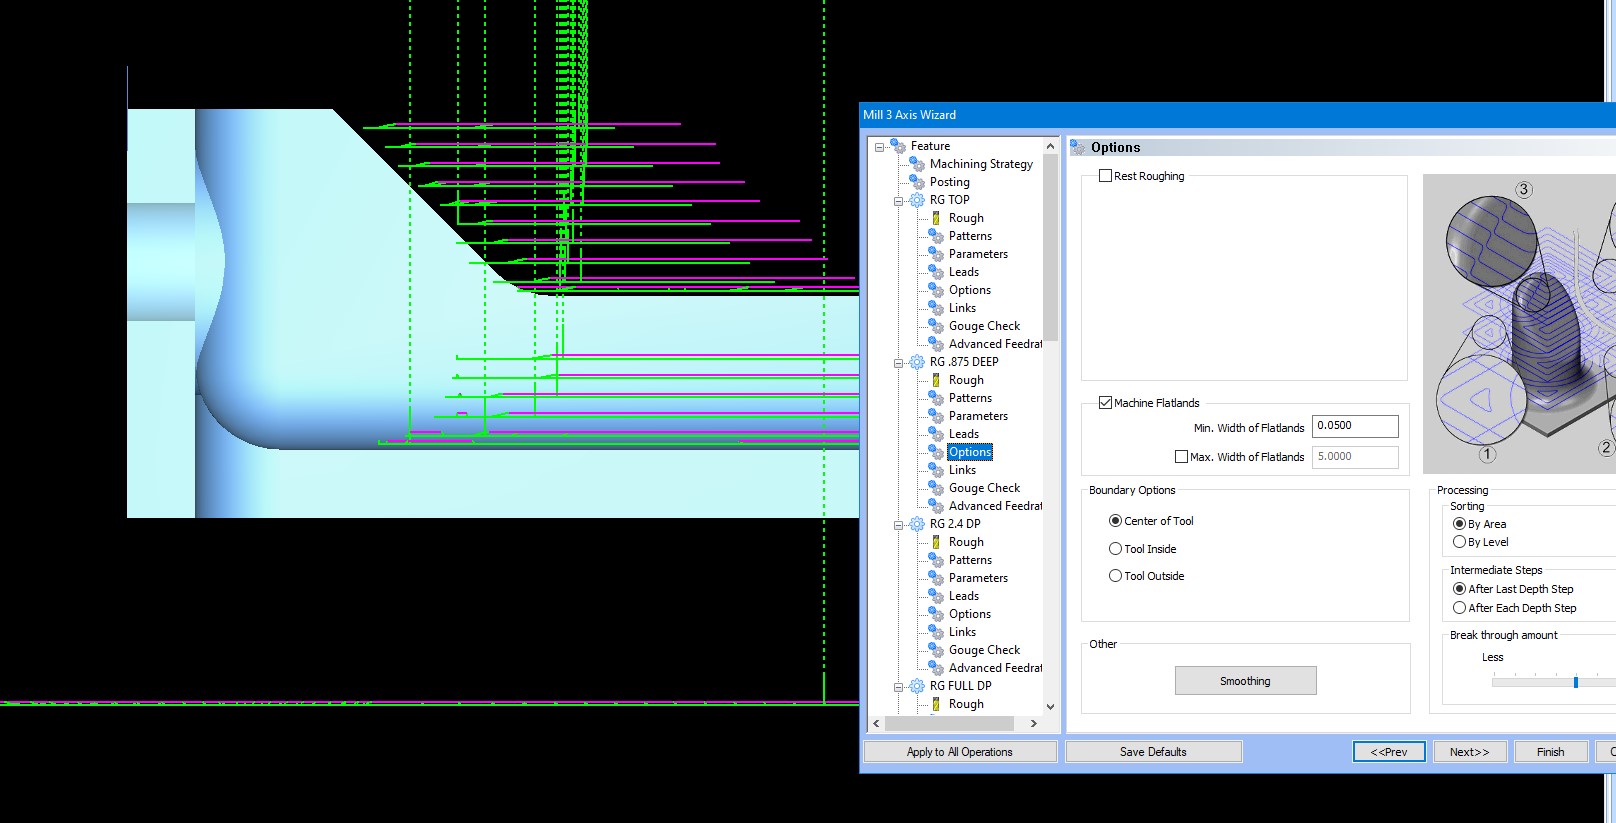
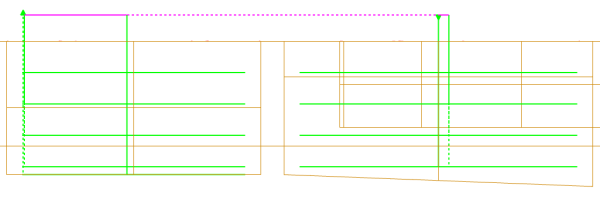
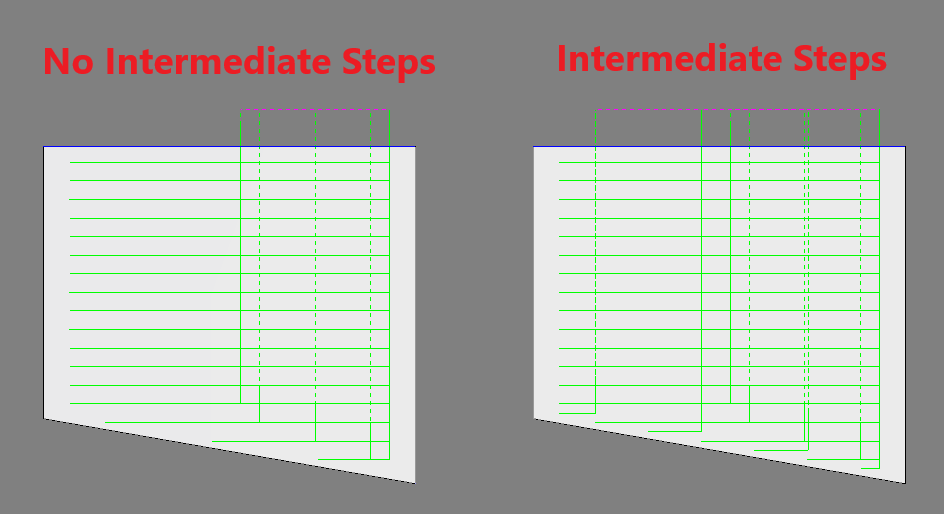
This applies to both flat bottom and tapered bottom pockets. As @TheWeave shows above you can use Intermediate cuts to add cuts in between depth cuts…but this does not help for the last cut that was not created. We can see in this image here that the depth cuts are not all the way to the floor but the distance to the floor is also less than a full depth step.

So how can we get around this?

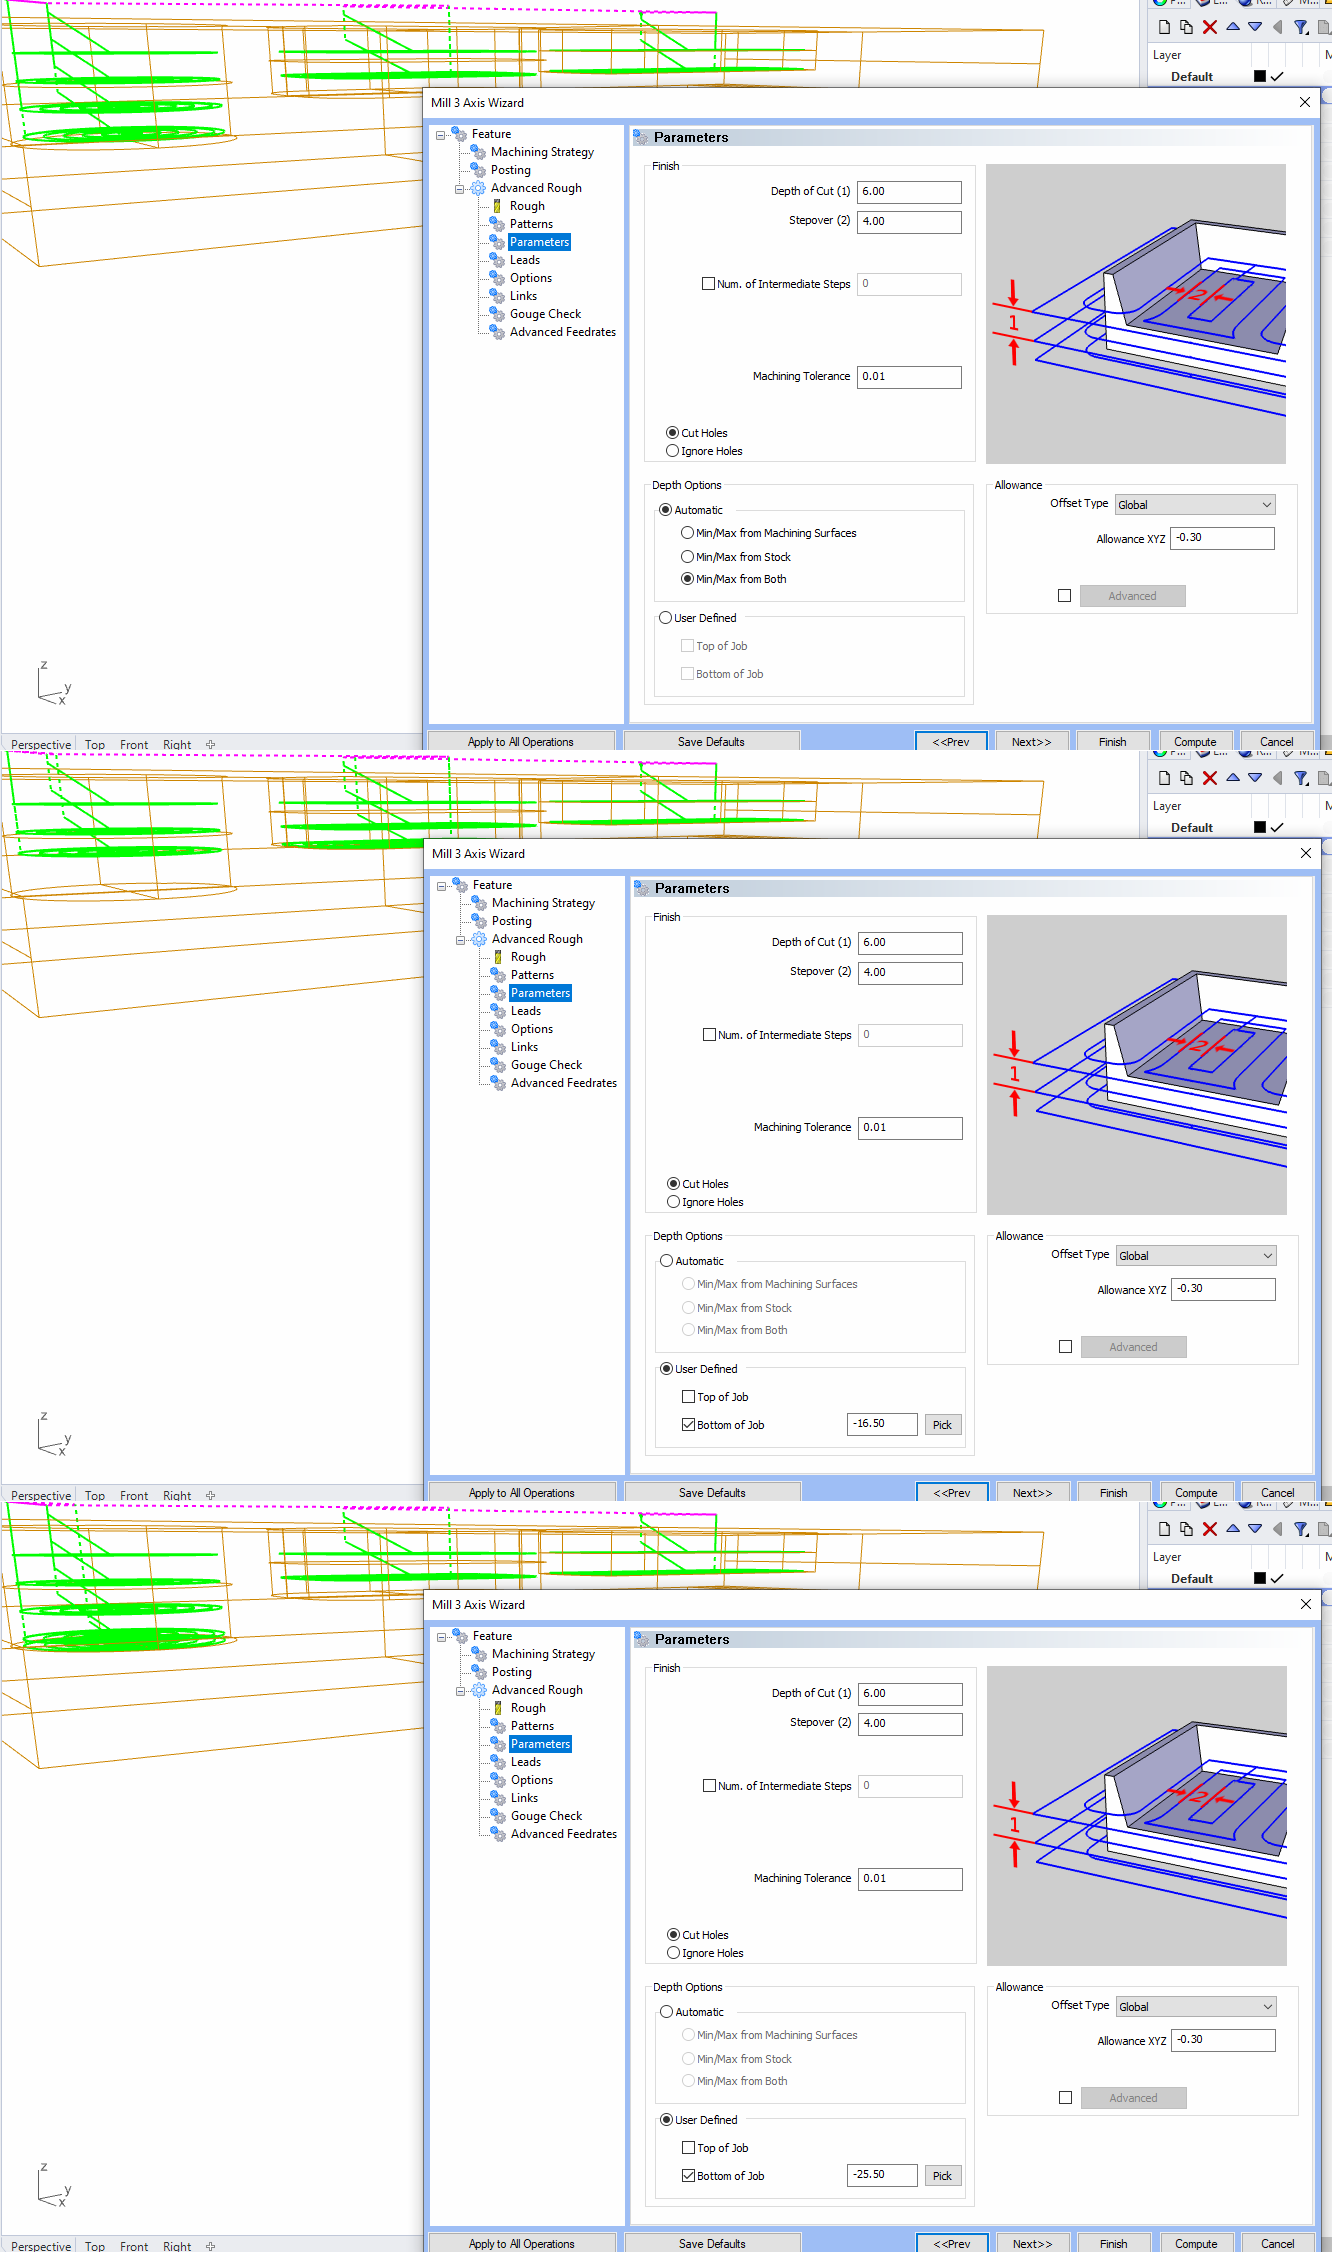
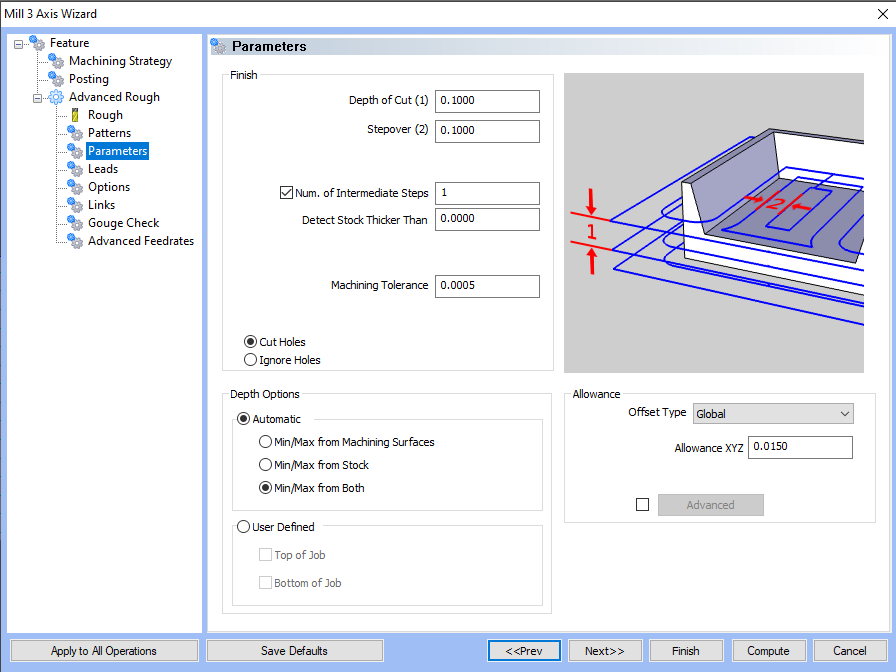
For pockets with flat bottoms and using the Advanced Rough toolpath, we can simply turn on the Flatlands option found on the Options page. This will then add a pass at the bottom and solve the issue.

Using Intermediate Steps as suggested may work, but will add the extra cuts in between all depth cuts on the way up and you may not want to spend that machining time.

Another option is making 3 separate features where you can make the depth cut an even division of the depth(plus stock to leave) thus allowing the tool to get as low as possible for each pocket.

So why do we use this method:
One reason I can think of: If we were to calculate going from the bottom up, what we will end up getting is a 1st cut that varies in depth. With lots of material(metals) and tooling it is not good to have an initial light cut…especially when breaking through the “Crust” of mill stock. When cutting mill stock you must make sure you are breaking through the crust layer and getting the tool underneath or you will kill tooling. But this is only one example. Because of the nature of creating software to support such a wide variety of applications such as CAM it really is impossible to create the perfect solution that will satisfy everyone in every situation. From my experience having the depth calculated from the top down is common in CAM systems.

HTH: I hope this helps. :slight_smile:

Alex

1 Like

Thx Alex,
you fully grabbed my problems. The hope is always to be able to make an improvement somehow. In other CAMs also the only solution is often to divide the problem among several operations.

In this particular case having ‘Flatlines’ and/or ‘Intermediate Steps’ alleviates the problem. I’ll sometime try to check, how it goes with just ‘Advanced Rough’ and ‘Advanced Z Level Finish’. At a first glance it didn’t work quite well because ‘Rest Finishing’ didn’t work.

Regards, Harald

No Problem Harald. It has sparked some conversation between the developers and I. There really isn’t 1 toolpath that will be a complete solve. This is why we have so many different toolpath strategies. Each strategy has a solution to a “use case” that the others don’t handle so well. By having a diverse toolbox of strategies we provide the user with all the tools to get it done :wink: But we do always try to improve which is why I wanted to dig into it. Alas, this one is currently best solved as covered above. But we will always keep looking for better solutions for you.

Hello All,

Would the ability to set the depth of cut to be a “max depth”, work better ? So that the software can use various depths of cuts up to the users maximum set depth of cut. Apply the same for the Intermediate Steps, which I believe is more for material removal of angle surfaces where the step down will leave a lot of material.

Just a thought !

Thanks,
David.

Hey Harald,

As for the Z Level Rough guys, I made this document here that you can give to them. It covers how to calculate a depth of cut that allows the toolpath to machine to the allowance of the floor.

Create Final Z Level Pass Down to Allowance.pdf (656.0 KB)

Hopefully this helps!

EDIT: as a note for multiple pockets, 3x Pro can create flatlands toolpath on all floors. For 3x Standard, you would want to break up that feature into individual features. One for each pocket.

for better handling see ideas https://discourse.bobcad.com/t/parameters-parent-child-with-lock-unlock

I do not see an improvement here, as it does not solve the initial problem: each pocket should be milled to its full depth, even if all have different depth.

Wow, thx.

  • Flatlands: understood. Sure the solution, if you own it.

  • Using formulars: yes indeed. You have illustrated this in a perfect manner. I might ask: why isn’t this way used from BobCAM in ‘Z-Level Rough’ operation without having the user to do all the calculations? It could also be use in ‘Advanced Rough’

and what is about this:


going also from top to bottom, but the last step is just the remaining depth minus allowance?

Regards, Harald

Both of these questions could be assessed by the development team to see if they can come up with a better solution to handle the final Z level pass in the feature.

I do believe this is the reason they came up with the “Machine Flatlands” option in the feature, but there isn’t really a good way to add that into Z Level Rough currently. Just have to calculate it manually. This could be a feature request for 3x Standard though.

@MillingGuy It could be possible to potentially create toolpath in that fashion. However, they would probably have to completely redo the logic in the code for that. I am not sure if that is really warranted if we already have a solution for this case (Using the Flatlands Option).

I will go ahead and compile a feature request for this and refer it back to this forum post. Feel free to add to this if you guys have anymore ideas on how you might want to see this implemented differently.

Thanks all!

Hi Folks,

We have discussed this several times over the years.

I made a video awhile back to describe this. I believe it’s a misunderstanding of what the toolpath is doing, versus expectations.

The answer is either use a different strategy or alter the expectations and adjust, as others have posted in this thread.

So basically, the “Rough” operation is a “MATERIAL REMOVAL” strategy and not a “SURFACE CUTTING” one…

It can be controlled by the stock. The tops and bottoms of all the various parms. and a couple others i think.

1 Like